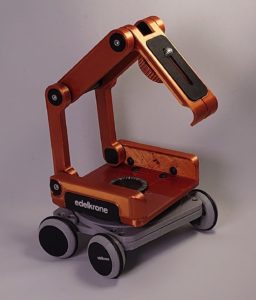
The Edelkrone Ortak Skater 3D was in my second order with Edelkrone, along with the Pocketshot 3D. Essentially, it’s a table-top dolly for your camera, powered by your fingers.
As mentioned in the review of the FlexTILT Head 3D, the Ortak range has them send to you a small box, in which are all the metal parts for the item. The remaining parts you are then able to 3D print yourself.
The motivations behind this scheme, as I understand them, are that it:
- Saves the cost of producing the parts (tooling/machinery)
- Saves the cost of shipping the parts
- Saves the world from more plastic
- Allows you to have a unique accessory that can reflect who you are
In contrast to the FlexTILT Head 3D, the Skater 3D doesn’t have a full-metal equivalent. This means that when you print it out, yours will truly be an individual accessory.
Designs
The Edelkrone Ortak Skater 3D designs are available for you to download once you’ve purchased the kit. They come as a collection of STL files for opening in your preferred slicer application (I generally use Cura). As part of the download, you get the designs for the individual parts, but also an all-in-one option to print everything in one go. This means that you don’t have to worry about “have I printed the correct number of each thing”. But on the other hand, if that print doesn’t complete for some reason, you’ve wasted a lot more material…
For mine, I chose a utilitarian grey because a) it was the easiest to hand and b) it’s more of a functional item that doesn’t need to stand out.
I’m also pretty sure I used the Monoprice Maker Select Mini printer for this – it was my first 3D printer, but also the smallest. This shows that size isn’t everything! Especially if what you’re printing isn’t urgent.
Assembly
Given that the Edelkrone Ortak Skater 3D is basically a platform with wheels, it’s difficult to get wrong. The most challenging stage turned out to be getting the bearings to fit into the halves of the wheels. Then having them fit together and align. The ‘treads’ for the wheels are in fact simple O-rings, which also means that should you lose one, replacements should be easy to find.
To be honest, I have to admit the wheels on mine do look slightly wonky from above. However, as they are still perfectly round, this doesn’t introduce any wobble when in use.
The only other thing I would question is the covers for the wheels. These are small metal discs backed with adhesive. Except they’re not very sticky and I’ve managed to lose two already.
Although come to think of it, I could always print some replacements with locator pins to ensure they don’t fall off…
Usage
Looking at the imagery of the Edelkrone Ortak Skater 3D on their website, shows that it’s most useful when creating footage of small things. So for any B-roll you may need of tabletop objects or macro photography with tracking shots, you’re going to find this little device really useful.
If you combine the Skater 3D with the FlexTILT Head 3D, then you’ll have something that can fit in your pocket for travel, making them perfect for product shots wherever, with whatever angle you may need!
The Edelkrone Skater 3D is available from edelkrone EU for £26
If you have a project that may need something 3D printed, feel free to contact us to find out how we can help.