The Edelkrone Ortak PocketSHOT 3D was in my second order with Edelkrone, along with the Skater 3D. Essentially, it’s a foldable camera support that can be adapted into multiple configurations.
A few of these would be:
- Shoulder mount
- Selfie stick
- Monopod with belt clip
- Top handle
- Desk stand
- Handgrip with ¼”-20 accessory mount
Plus it fits in a pocket!
As mentioned in the review of the TiltHEAD 3D, the Ortak range has them send to you a small box, in which are all the metal parts for the item. The remaining parts you are then able to 3D print yourself.
The motivations behind this scheme, as I understand them, are that it:
- Saves the cost of producing the parts (tooling/machinery)
- Saves the cost of shipping the parts
- Saves the world from more plastic
- Allows you to have a unique accessory that can reflect who you are
In contrast to the TiltHEAD 3D, the PocketSHOT 3D doesn’t have a full-metal equivalent. This means that when you print it out, yours will truly be an individual accessory.
Designs
The Edelkrone Ortak PocketSHOT 3D designs are available for you to download once you’ve purchased the kit. They come as a collection of STL files for opening in your preferred slicer application (I generally use Cura). As part of the download, you get the designs for the individual parts, but also an all-in-one option to print everything in one go. This means that you don’t have to worry about “have I printed the correct number of each thing”. But on the other hand, if that print doesn’t complete for some reason, you’ve wasted a lot more material…
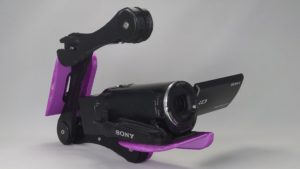
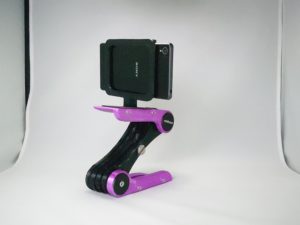
I chose for mine to print it in Purple Silk for the top and bottom plates, with plain black for the arms. I think that the contrast is quite effective as the metal parts are also anodised black.
Assembly
Of the three available models, I have to say this one might actually have been the most awkward to fit together. Whilst is it essentially eight pieces, the four ‘arms’ are all slightly different. So don’t do as I did and try and assemble it before they’ve all finished printing! Otherwise, you may have to take it apart and do it again properly… 😉
The items in the box also include a couple of small magnets, which mount into the end arm. These are used for attaching the included Allen key, which you’ll need for adjusting the stiffness of each joint. Thankfully, it’s a standard 3mm size, so if you manage to misplace it, getting a replacement won’t be difficult.
The only real difficulty with assembly is fitting the spare/bottom ¼” ‘tripod’ bolt into the hole in arm #1. This is where it’s supposed to live when you need the lower plate to sit on a table (for example).
Usage
I have to say, I have actually used the Edelkrone Ortak PocketSHOT 3D out and about. I was invited to attend a ceramics workshop run by a friend for ‘throwing’ some mini-pots on a mini potters wheel. So I took with me the PocketSHOT and a (3D printed!) mobile phone mount to attach to it for some desktop filming. For this, it was really effective, as it didn’t take up much space and allowed me to get the reasonably-close shots I wanted. Which reminds me I need to do something with that footage…
I can also see it getting used for all of the use cases in the list at the top of the page – it really is remarkably flexible! For which I mean usability-wise, not just because it’s an articulated arm in four pieces. 😉
I do have to say, for what it can do, it’s a lot more useful than a plain selfie stick! Especially for the price. If you do any kind of mobile/small-camera photography/videography, it’s almost worth getting a 3D printer just to make one.
Available from Edelkrone EU for £25
If you have a project that may need something 3D printed, feel free to contact us to find out how we can help.